Friday, December 04, 2009

better than from a bakery granola

I love granola for breakfast. Not only do I make it quite frequently, but I do often order it when going out for breakfast. I'm a bit of a granola snob and I definitely know what I like. This granola found in Baked: New Frontiers in Baking cookbook is great. Like really, really great.

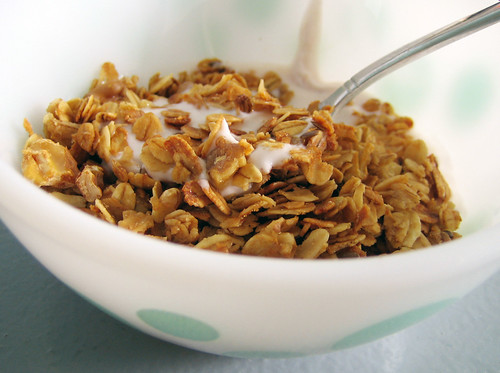
Look at it, this granola has clusters! Every granola I have made, while delicious & wholesome, doesn't have the goodness that makes them clump up like the granola found at a great bakery. Look no further. This granola clumps, it's crunchy and it's easy to make. Sure, there's a bit more sugar than I'm used to putting in my granola, but it's worth the extra calories. Do it for the clumps!

Want to make your friends, co-workers and family really happy this holiday? Just bake up a batch, throw it in a large glass jar, top it with a bow, and call it a homemade gift made with love. Better yet, bake up a double batch (I've done it and it works beautifully) so you have some for yourself and a friend. Guaranteed happiness.

better than from a bakery granola
(adapted from Baked: New Frontiers in Baking)
2 c organic large-flake rolled oats
1 t cinnamon
pinch of nutmeg
1/2 t salt
3 T plus 1 t canola oil
1/4 c honey
1/4 c firmly packed light brown sugar
1 t pure vanilla extract
2/3 c whole almonds
2/3 c raisins

Preheat oven to 325 F. In a large bowl, toss oats with cinnamon, nutmeg and salt. In a separate bowl, whisk together the oil, honey, brown sugar and vanilla until blended. Pour the wet mixture in with the dry and use your hands to combine the two until everything is well coated and your hands are gooey. Lick them if you must, but wash your hands right after.

Cover a baking sheet with parchment paper and pour the mixture over top. Spread it out evenly, but also keep in mind clumping is a good, good thing. Bake for 10 minutes and then use a spatula to gently flip the granola over. Sprinkle with almonds and return to the oven for another 10 minutes. Add raisins and bake for another 5 minutes. Remove from oven and cool completely in the pan. Use your hands to break up the granola...but again, don't go overboard (remember the clumps!). Place in a tightly lidded container.
Labels: , , , , ,

Sunday, November 02, 2008

autumn sweets: salted honey caramel apples

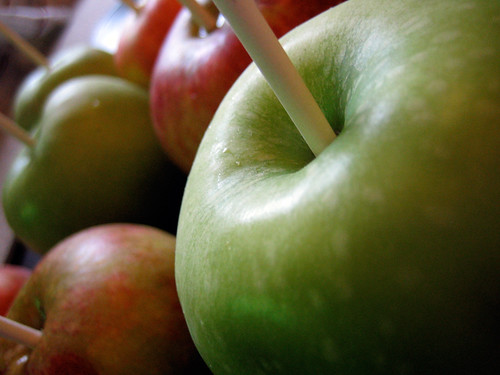
This Halloween I wanted to make something special for our friends. We had a few scary movies planned but I wanted to make an autumn treat. When I saw 101 Cookbook's recipe for caramel apples, I was instantly won over. The ingredients were simple: honey, cream, salt, apples. The previous weekend, I picked up several kinds of apples at a local orchard and I had some local blueberry honey from a previous farm visit. Local heavy cream was easy to find and I figured adding in some imported french fleur de sel wouldn't ruin my almost all-local sweets. I also decided to toast and roughly chop some almonds which not only would provide a nice crunch and counter balance the sweetness, but would also provide some traction to prevent the caramel from sticking to my baking sheet. The resulting apples were beautiful and delicious. I should note, that if you don't like honey, don't make these as as the honey flavour is definitely there, even with a mild-tasting honey.

For the apples, I used Granny Smith's and Cox Orange Pippins which are both very crisp apples with a nice bit of tartness. I purchased the lollipop sticks at a local kitchen shop in Chinatown and got to work on the caramel. It was easy going and while I do have a candy thermometer, I really rely more on the old fashioned cold water test for figuring out which stage my caramel has reached. I can never get my candy thermometer to reach the "hard ball" stage but using my fingers to gauge a bit of caramel dropped in ice water never fails. For me it took about 30-35 minutes to reach caramel perfection. I was afraid that the caramel would slide off the apples, but luckily that didn't happen!

After dipping the apples in the caramel, I had extra caramel leftover, so I spread some out on my silpat mat, adding in some roasted almonds and some fleur de sel and let cool in the refrigerator. Once it was cool and ready to cut, I sliced the caramel into squares and wrapped the golden nuggets in waxed paper.

salted honey caramel apples
(adapted from 101 Cookbooks)
8 tart, crisp apples
8 lollipop or popsicle sticks
1 3/4 c heavy cream
1 3/4 c mild-flavoured honey
2-3 t fleur de sel
1/3 c chopped roasted almonds

Pierce apples with a stick and set aside.

In a large heavy-bottomed pot, heat the cream and salt until small bubbles appear. Whisk in the honey and bring to a boil, stirring constantly with a wooden spoon. You want to bring the mixture to a constant steady boil, so turn down the heat to medium or medium-high. If you are using a candy thermometer, you should reach 250-290F or do the cold water test. It should take 20 - 35 minutes to reach this stage. Look for a rich, golden caramel colour and the mixture should look heavy. The caramel reached as high as 250F and I let it boil away at that temperature for 5 minutes or so, testing always in cold water to make sure I had the correct consistency. Take caramel off the stove and carefully dip each apple in the caramel mixture, setting the finished apples on lightly oiled waxed paper or a silpat mat covered in chopped almonds. Place in fridge to set and then wrap each apple in waxed paper.

If you have any leftover caramel, pour the remaining caramel onto a well oiled sheet or silpat mat and sprinkle with almonds and fleur de sel. Refrigerate until cool and cut into squares, wrapping each square in waxed paper.

Labels: , , , , , , ,

Friday, May 16, 2008

chocolate for breakfast: cocoa-coconut granola

Well, we made it back from our 10 days on the road no worse for wear. Our trip was amazing and I still have a ton more photos to upload onto Flickr. The painted hills in Oregon were beautiful, we had a great warm night of camping in the Washington Okanogan, we drank delicious beer at the Silver Moon Brewery in Bend (and also had some really good Hawaiian beer & my birthday dinner at the Kona Mix Plate)...and then there was Portland! Oh boy, do I love that city. We ate at Pine State Biscuits twice for breakfast, thought we might win at trivia at the Basement Pub (we didn't), played many games of darts at various locales, and drank my favorite beer at Amensia Brewing (their Copacetic IPA, if you must know).

But now I'm back home, the weather in Vancouver is not only sunny but HOT. Hooray! I made this granola a few weeks ago, but like all granola, once it's tightly put away in a cupboard it can last ages. And oh boy, it was the perfect breakfast treat to make a Vancouver homecoming breakfast truly worthwhile. I took Nigella's recipe for cocoa granola and omitted the peanuts (but golly, that sounds good too!) and added coconut and almonds instead. So far I've eaten it with strawberries while the husband enjoyed his with bananas...but the best was scooping up the deliciousness with Granny Smith apple slices. No spoon required! It also helped that I was eating my granola with my favorite store-bought yogurt, Liberté's coconut yogurt. It seriously made the chocolate and coconut in the granola just a bit more special.

While you might think this is a decadent breakfast (and it is), it's also low fat. There's applesauce instead of a lot of oil and if you don't have applesauce on hand, it's really easy to whip some up. This granola was crunchy, sweet (but not tooth-achingly so) and if you wanted to make this all vegan, just sub in some more agave or brown rice syrup to replace the honey. I'll definitely be making this again.

And if you want a bit more reading, why not check out my latest post over at the Food Network Canada blog, Bazaar. It's a post about my favorite Vietnamese sandwich which is found in Vancouver's Chinatown for a mere $3.15. And you can find out just how mis-named this blog really is...do I really like sandwiches? Find out now!

cocoa-coconut granola
1/4 c cocoa
4 1/2 c rolled oats
1 c shredded coconut
1/2 c sunflower seeds
1 c roughly chopped almonds
1 t kosher salt
2 t ground cinnamon
large pinch each nutmeg & cardamom
3/4 c brown sugar
1/3 c agave nectar
1/4 c honey
3/4 c applesauce
2 T olive oil

Preheat oven to 300. In a large bowl, combine all the dry ingredients together. In a small saucepan, heat up agave nectar, honey, apple sauce and olive oil just until extra runny and then pour over dry ingredients. Mix until everything has been coated with the wet sticky stuff. Pour into a large glass baking dish or several walled cookie sheets and place in the oven, turning over occasionally so that everything dries out evenly. After 40 minutes to an hour, remove from oven and cool on counter. Store in a tight lidded container.

Labels: , , , , , , , ,

Sunday, April 27, 2008

put the crack in cracker: chocolate-covered caramel crunch

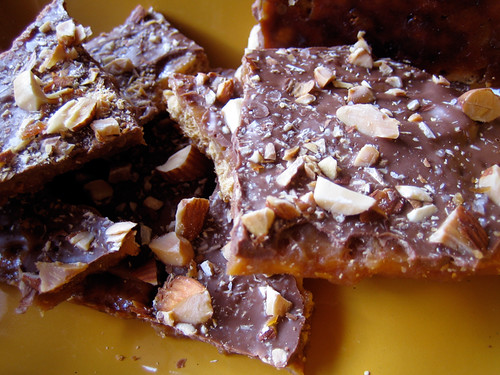
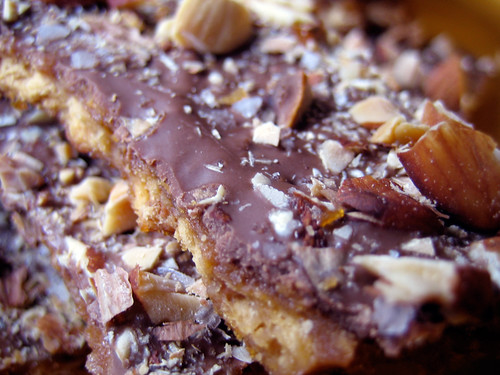
What more can be said about this super addictive snack (crack)? It's been written in about a hundred different places and it all started here. It's seriously good. Insanely addictive. Shall I go on?

The crazy thing about this candy is that it uses Matzoh crackers. For reals. The only Matzoh I had on hand was the ground up meal (perfect for making matzoh balls), but not so good for making candy. So I turned to the next best thing in my cupboards: Stoned Wheat Thins. I actually had to run to my cupboards to double check this and yes, they are indeed, labeled "stoned". The drug-addled theme of this post is not lost on me!

These are easy to make...in fact, too easy to make. No candy thermometer needed. Make a batch, share them with your friends and then pass along the recipe because they will ask for it. They taste like a homemade Skor bar and you'll find yourself going back for "just one more piece". Want to make this vegan? Get yourself some vegan crackers, some Earth Balance and your favorite vegan chocolate. Get hooked today!

chocolate-covered caramel crunch
enough crackers to line a baking sheet
1 c unsalted butter, cut into chunks
1 c packed light brown sugar
big pinch of fleur du sel (optional)
1/2 t vanilla extract
1 c semisweet chocolate chips
1 c toasted coarsely chopped almonds

1. Line baking sheet with foil, making sure you have enough to create a tall rim around the pan. Line pan with crackers, breaking up pieces if you have to, to fill in any cracks. Preheat the oven to 375F.

2. In a medium sized saucepan, melt the butter and brown sugar together over medium heat. Stir frequently until the mixture begins to boil. Boil for 3 minutes, stirring constantly. Remove from heat and add in vanilla. If you are using unsalted crackers, add in salt. Pour caramel over crackers and spread evenly with a silicone spatula.

3. Put the baking sheet in the oven, reducing heat to 350F. Bake for 15 minutes, watching carefully that the caramel does not burn.

4. Remove from heat and cover with chocolate chips. Let stand 5 minutes until chocolate melts and then spread evenly with a spatula. Sprinkle with toasted almonds and fleur du sel or whatever toppings you desire. Let cool completely and then break into pieces, storing in an airtight container.

Labels: , , , , , ,

Thursday, November 01, 2007

the contessa's voluptuous breakfast: orange yogurt


A couple of weeks ago, I had company for brunch and I wracked my brain trying to figure out what to make. After consulting recipe books and perusing my blogroll, I decided to keep things familiar. I made some almond & cherry scones, whipped out my apple butter, put out my huge glass jar of homemade granola and I fancified some yogurt. You see, last year (when I had cable tv), I saw the Barefoot Contessa make a fancy brunch for her fancy friends in her fancy kitchen. I was impressed. But I was most impressed by her tricked out orange yogurt. It seemed so easy....drain store-bought yogurt overnight and then throw in some add-ins. She transformed a runny breakfast stand-by into something voluptuous, decadent and still healthy.

So the night before my morning guest was to arrive, I set up my coffee pot and filter and drained my yogurt in that. In the morning I was rewarded with thick, really thick, yogurt. I added in some honey, coconut and of course fresh orange juice to rehydrate and zest. Because I was serving this with granola I didn't want to add in the nuts and raisins the original recipe called for. It didn't lack for a thing...it was amazing as is!

Yesterday morning, I decided to try the yogurt again, but since I was planning on eating it with some fresh fruit, I stayed on the Contessa's side and added some dried fruit and nuts for a bit more depth. Once again, I was blown away! Sure, it requires some advance planning to drain the yogurt, but the results are truly outstanding. I use my favorite 0.3% local Fraser Meadow organic yogurt and you'd never guess it was low fat by how it looked. Spoonable and swoonable, indeed.


orange yogurt
1 large container of plain yogurt
1 orange, zested and juiced
1/4 c coconut
1/4 c almonds, roughly chopped
2 T dried cherries, chopped
1-2 T honey

Line sieve with cheesecloth and suspend over a bowl — or just use a coffee pot and filter like I did. Add yogurt and let drain 3 hours or overnight. Throw out liquid and place the thickened yogurt in a bowl and add remaining ingredients, stirring well. Serve plain or top with granola and fresh fruit.

Labels: , , , , , ,

Saturday, August 18, 2007

pantry raid


I'm definitely in holiday mode, not cooking mode. Truth be told, there's not a lot of baking or cooking going on when there's itineraries to think about, travel forums to peruse, and how to pack 35 days of clothing & toiletries into one small and light carry-on pack. We were lucky to find a super cheap flight to Frankfurt, so unfortunately we won't be flying or heading into London or the UK at all. But there's lots of other great countries to explore. Our super flexible and very rough journey will take us to: Frankfurt > Koblenz > Cologne > Luxembourg > Ghent > Bruges > Brussels > Antwerp > Amsterdam > cycling around Holland > Berlin > Vilnius > Kaunas before we fly back into Frankfurt and back home to Vancouver. Any more tips and suggestions about what to see/do/eat while in Europe are more than welcome!

We leave for Frankfurt on Sunday and I'm trying to only buy groceries one day at a time so that nothing goes to waste while we're on holiday. It's a sad day when my fridge holds only yogurt, coffee cream, beer, mustard, pickles, almond butter, maple syrup and miso paste. So when I wanted to make something for breakfast, I had to raid the cupboard for inspiration. I've made granola many times before using variations on the same recipe, but I decided to forgo the healthy-ish granola of my past and try for something a bit more treat-like this time around. While the results were sweeter than my regular granola, I'm sure this is still much better than the store-bought granolas found on the shelves of your local supermarket. It not only makes a good breakfast tossed with some yogurt and fresh fruit or turned into cereal in a bowl of skim milk, but it tastes good just eating it out of hand as a mid-afternoon snack. I think the next time I make this, I'll sub in just regular ol' peanut butter for the almond butter since peanut butter makes more of a flavour impact. Regardless of changes, this recipe is a keeper and a great start to a busy day.

vanilla almond granola
4 c old-fashioned oats
1 c sliced almonds
2 T flax seed
3 T brown sugar
1/4 t salt
1/8 t cinnamon
1/3 c vegetable oil
1/4 c honey
1 T almond butter
1 packet of vanilla sugar (or just 2 T of white sugar)
4 t vanilla extract

1. Preheat to 300°F. Mix the first 6 ingredients in large bowl. In a small saucepan over medium-high heat, combine oil, honey, and sugar. Stir honey mixture until it just begins to bubble. Remove from heat and stir in the almond butter and vanilla. Once the almond butter melts, pour the hot liquid over the oats and stir well until throughly mixed.

2. Spread granola on a large rectangular baking sheet or pan. Bake until golden brown, stirring occasionally, about 30 minutes. Remove from oven and cool completely. Break apart and store in an airtight container.

Labels: , , , , ,

Tuesday, April 10, 2007

puddin' n' tain


When I have leftover rice, I usually end up making some fried rice, a cold rice salad or fried rice patties. This time, I decided to experiment with making something sweet. I was all set to make some totally faux-horchata but at the last minute decided on rice pudding instead. I've made rice pudding before with arborio rice using a custard base, but this recipe is a bit different as no eggs are necessary, so it would be really easy to make this dessert vegan by using rice or soy milk instead of dairy. For me, this dessert manages to kill two birds with one stone: not only do I get to use up leftover rice, but I also can finish up my open can of coconut milk leftover from last night's peanut sauce. This pudding thickens up quite nicely and resembles the kind of coconut rice pudding dessert found at Indian restaurants. I love the taste of cardamom here and the crunch of the almonds adds a nice twist to this creamy, coconutty dessert.

coconut rice pudding
2 c cooked long grain rice
2 c skim milk
1 c half & half cream
1 1/2 c coconut milk
1/2 c white sugar
1 t cinnamon
1/2 t ground cardamom
1/2 c raisins
1/4 c coarsely chopped almonds

1. In a medium saucepan, heat 2 cups of skim milk with the rice over medium-high heat. When the mixture starts to boil, lower heat and stir until thickened, about 5 minutes.

2. Add in the cream, coconut milk, sugar, cinnamon and cardamom and return heat to medium-high. When mixture boils, stir for a few minutes and then lower heat to a simmer. The milk will start to evaporate and the mixture will thicken. Stir occassionally, making sure the mixture isn't getting too hot (ie. sticking to the bottom of the pan!). Stir in raisins and almonds, shortly before removing from heat. Remove pudding from heat when mixture is just shy of rice pudding consistency. The mixture will thicken up when cool. Place pudding into a large bowl and cover with cling film touching the surface to prevent skin. Serve at room temperature or cool.

Labels: , , , , ,